
My husband was out of town this past weekend, so I decided it would be a great opportunity to repaint his office and the attached sitting room. This space used to be an apartment. The second floor was expanded during the Depression to add on this space which, when you take out the bathroom (I showed its renovation last February), is a kind of funky L-shape. The section that is now an office used to be a wee kitchen.
After the tenant moved out, we took out the kitchen, stripped some of the woodwork, changed the light fixtures, replaced the linoleum with cork flooring, and put in new (now old) carpet. For some time, I've been wanting to replace the carpet again, but can't do that until after repainting. Anyway, this seemed like the time.
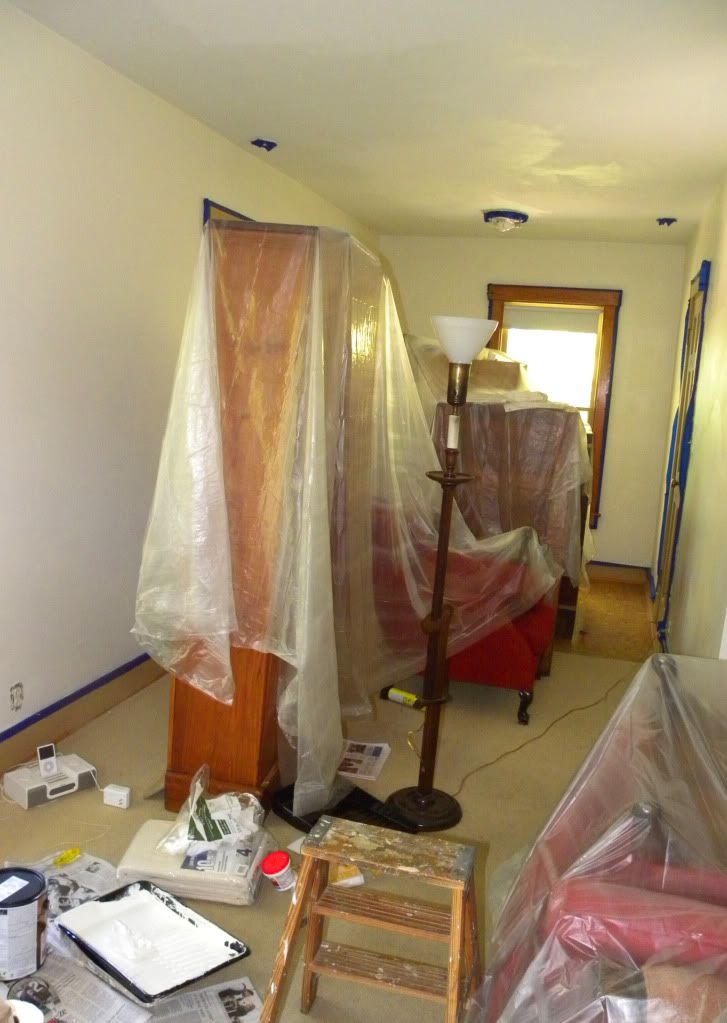
 Part of the trouble is there is way too much heavy furniture in that room -- a set of three wood lockers we use to store DVDs and tapes, three antique armchairs, two bookcases, a heavy oak desk, an oak filing cabinet, a TV, and a couple of small side tables. Since I couldn't move all this by myself, especially through the narrow doorway into the hall, I dragged it all to the center and covered it with plastic. That seemed like a clever idea until I found that there were areas along the perimeter that were too tight to set up a ladder, so I had to paint some parts of the ceiling perched on a ladder unsteadily propped against the wall.
Another way I was being clever was by using paint we already had. I'm all about saving money when I can. I had almost a gallon of ceiling paint, which I managed to eke out to cover the whole ceiling. I thought. Then Saturday evening as I was taping the woodwork in preparation for Sunday's wall painting, I noticed a good sized area I had missed. So I scurried off to Lowe's to buy another gallon of the exact same Valspar ceiling paint. I'll just touch up the missed area and some other "thin" areas, I thought. The gosh darn ceiling paint isn't the same! Can you see it in the picture below? It depends on the light and the angle, but I can clearly see the areas I touched up. Sigh. So there is more ceiling painting to be done.

For the walls, well, I found an almost full gallon of Sherwin Williams paint in the basement clearly marked "office." It looked a little different to me, but I figured it must dry a bit darker. After seeing how the ceiling needed more than a gallon, I knew I'd need more paint, so on that trip to Lowe's, I also stopped at Sherwin Williams, paint in hand, to ask for another gallon of the same thing. They no longer make the EverClean paint the young man said. He was amazed that the paint was still good. In fact, all three employees (it was dead in the store) came over to look at the paint and discuss the options. I asked for a comparable paint in the same color. No problem, and the paint was 40% off, my lucky day -- until he rang it up. $44 dollars for one gallon of paint (at 40% off!) and an edger. So Sunday, I cracked open my extremely valuable Dover White paint from Sherwin Williams and, after edging, realized it was the color from two paintings ago. I'm thinking the paint was from 1996. No wonder the guys had been amazed that it was still good; they were hardly more than toddlers when that paint was mixed. So the paint is now not the warm, pale-butter-white I wanted, but a generic white-white. Oh well, at least it will be clean and fresh. If I ever get the room completed, I'll show the end result.
 |
| Right after the tenant moved out in 1996. The door beside the sink leads to the tiny bathroom. |

Another way I was being clever was by using paint we already had. I'm all about saving money when I can. I had almost a gallon of ceiling paint, which I managed to eke out to cover the whole ceiling. I thought. Then Saturday evening as I was taping the woodwork in preparation for Sunday's wall painting, I noticed a good sized area I had missed. So I scurried off to Lowe's to buy another gallon of the exact same Valspar ceiling paint. I'll just touch up the missed area and some other "thin" areas, I thought. The gosh darn ceiling paint isn't the same! Can you see it in the picture below? It depends on the light and the angle, but I can clearly see the areas I touched up. Sigh. So there is more ceiling painting to be done.
For the walls, well, I found an almost full gallon of Sherwin Williams paint in the basement clearly marked "office." It looked a little different to me, but I figured it must dry a bit darker. After seeing how the ceiling needed more than a gallon, I knew I'd need more paint, so on that trip to Lowe's, I also stopped at Sherwin Williams, paint in hand, to ask for another gallon of the same thing. They no longer make the EverClean paint the young man said. He was amazed that the paint was still good. In fact, all three employees (it was dead in the store) came over to look at the paint and discuss the options. I asked for a comparable paint in the same color. No problem, and the paint was 40% off, my lucky day -- until he rang it up. $44 dollars for one gallon of paint (at 40% off!) and an edger. So Sunday, I cracked open my extremely valuable Dover White paint from Sherwin Williams and, after edging, realized it was the color from two paintings ago. I'm thinking the paint was from 1996. No wonder the guys had been amazed that it was still good; they were hardly more than toddlers when that paint was mixed. So the paint is now not the warm, pale-butter-white I wanted, but a generic white-white. Oh well, at least it will be clean and fresh. If I ever get the room completed, I'll show the end result.


